12/27/2008

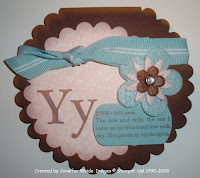
You Scallop Card

This is another swap creation, I think from November. Our "mission" was to use the Big Shot or do a gift card holder. This would work for either.

The base of the card is a scallop cut with the large scallop die for the Big Shot. It opens just like a regular card. Notice at the top that it's straight. I placed a folded piece of Chocolate Chip cardstock at the top of the die, with the fold just over the top edge of the die so it stays intact. Clear as mud? If that doesn't make sense, let me know and I'll find a clearer way to explain it!

The colors here are Chocolate Chip, Pink Pirouette & Baha Breeze. The pink scallop is cut with the smaller scallop die for the Big Shot from Bella Rose DSP. The Y's are from the Defining Alphabet and the you definition is from the coordinating Define Your Life set. I can honestly say I haven't used these sets much, but they were perfect for this creation! The you definition is stamped in Chocolate Chip on a Key Tag punch of Baha Breeze, the Y's in Chocolate Chip on the Pink Pirouette DSP. The flowers are from the Flower Fusion Too Accents & Elements kit. Rhinestone brad in the center. Baha Breeze striped grosgrain ribbon is tied around the top of the card.

I have another one of these that I did with my club ladies. Different colors as I used of most of my flowers in these colors for the swap. I hope to make it to my room tomorrow to work a little so I'll try and dig up the November club projects to share! Hope you're all having a great weekend!

12/26/2008

Love You Much sample


Here is my recent swap creation using the Love You Much set & DSP. I was trying to stay fairly simple as this was due during my Holiday crunch time! The card base is Chocolate Chip, background is Pink Pirouette stamped with the hearts from the set in Classic Pink Pirouette ink. Ribbon is Wide Chocolate Chip grosgrain. Love is stamped in Basic Brown and colored with Pink Pirouette ink using a blender pen. I added a Vintage brad to the center of the flower & layered it on Riding Hood Red. I used dimensionals to apply the saying layers over the ribbon.

Quick and easy! And that's just one of the great prints from this DSP pack! Contact me today to order yours!!!

OK, that's it for today! Time to find my bottle of wine and hit the couch! I worked til 3:00 today and I've been on here far too long since getting home!

Love You Much! Bundle Special

Everyone loves a sneak peek-especially at a reduced price!!! This bundle of items will be available in the next catalog, but SU! is letting all of us purchase them now-at a special price!!!

Love You Much Bundle, Item 115405
Dates: December 23, 2008 - January 31, 2009
The following items are included:
Love You Much stamp set (retail value $25.95)
Candy Lane Designer Series paper (Close to Cocoa, Pink Pirouette, Riding Hood Red, Very Vanilla) (retail value $9.95)
Heart To Heart punch (retail value $15.95)

Total Bundle Retail Value $51.85

Love You Much Bundle (20% off) $41.48 Item 115405

The items will be available in the new catty, but why wait??? Order them NOW and get a jump on Valentines day!

Note: The Candy Lane DSP paper is currently on backorder so you can't place an order for the bundle online. BUT contact me and I'll get your order in!


One sample coming soon!!! Just gotta venture upstairs and plow through my room to find it!

Retirement List & a SPECIAL from ME!

This is very late in getting to you, but I've been wrapped up in Holiday prep all month! I really can't believe it's Dec 26 already! The month has truly FLOWN!

Anyway, this catalog is on it's way out as the next Idea Book & Catalog will be released January 19! While that's always exciting, it's always sad to see our "old friends" go! I don't think I've taken a very big hit with this one, but I haven't yet pulled my sets off the shelf either!

Click HERE to see the list by Page Number

or

Click HERE to see the Alphabetical list

And, the good news for you. Since I missed alerting you all to a Free Shipping special while I was bogged down with HOLIDAY prep, I will offer my own. I will pay your shipping on ANY order of $65 or more that includes at least one retired set, good through December 31. Contact me directly to get the free shipping special. Online orders are always welcome through my demo site, but the free shipping will not apply that way!

Retiring sets are available through January 18. Happy weekend all!

Happy Holidays!

My apologies for the recent lack of posts! Hopefully I can get back on track from here on out! I hope everyone had a GREAT Christmas, or maybe are still having them! I know several people who were still doing things this weekend.

This post is just to check in to let you all know I'm alive and well! Pre-Christmas is always such a crazy time! And I have the new job this year to make it worse. That is going VERY well though and I'm getting more comfortable every day. I'm very glad I made the switch!

I made the Cardinal Christmas card from the last post for our Christmas card and we mailed 114 of them! We did opt out of any letter & pictures this year to make it easier though. I have a few more I need to finish up and get out this weekend. I love the way they all turned out and I've received many compliments, but I'm betting next year I choose one that doesn't have to be colored!!

I just hooked up the new scanner that I got for Christmas so I should have no problems posting!! I will be back soon with the retirement list, a special promo, and a recent swap creation. I'm going to leave you now though with a poem sent to me by my downline. I laughed very hard at this one-probably because you can't see the floor or anything else in my room right now!!! Cleaning it is on my agenda for the weekend!

'Twas the night before Christmas,
I'm glued to the tree.
I'm wondering what Santa brought just for me.
Could it be cardstock or chipboard or lace?
Or a Cricut, I said, with a smile on my face.
And that's when I heard him,"Hi Santa" I said"
You know.... good little girls should be in their beds."
"I know I should Santa,and now I've been caught.
But I was just so excited To see what you brought."
"Well, let's take a look in this room where you work.
He shook his head quickly,And left with a jerk.
I heard him exclaim as he put it in gear
"You've got enough crap, I'll see you next year!"

Merry Christmas to all of you and I hope everyone got a few new goodies for your stash!

11/24/2008

Cardinal Christmas!!

Here is a card I did for a swap last month with a Christmas theme. It may just be my Christmas card. And yes, I have gone insane to consider coloring ALL those cards-our list tops 100! I'm afraid to get the list out and take a look just yet! Every year seems like we add a few but can't take very many off!

Aside from the coloring this didn't take too long. I cut the Naturals Ivory cardstock with the Top Note Die. Next I stamped the Cardinal in Jet Black Stazon near the bottom & the Merry Christmas above it. The card base is Riding Hood Red. The Cardinal is colored with Riding Hood Red using the classic ink and a blender pen. I went over him lightly once, then a second time on the head/back/tail areas to make it darker. The leaves are Mellow Moss done the same way, lighter once then darker on one side. Branch is Close to Cocoa, feet & beak are More Mustard. I added a piece of the 1-1/4 Riding Hood Red/Very Vanilla Grosgrain ribbon (from the Holiday Mini Catalog) underneath the Top Note and & Vintage Brad on each side point. Oh, it's hard to see but I stamped the solid branch from the set on the Riding Hood Red in Riding Hood Red on each of the four corners. Sorry my scanner is still toast & the camera doesn't pick it up well.

Enjoy! Hopefully I'll be back soon, but no promises. This time of year is always so busy! I started the new job last Friday and it went well. Lots to learn. The days at home go sooooo fast though-I have yet to get very much accomplished! Thanks for stopping by!

11/08/2008

Still here!!

Wow, where has the time gone? Lots of things have changed around here since I posted last! We were enjoying nice warm fall weather until the last 3 days. It's now cold and windy. Not near as cold as it can be, but a definite difference from last week! Last weekend was warm, sunny, light wind in the low 70's. Today is overcast, very windy, high in the 30's. YIKES!!

Here is something else that's happened-Harvest! This was taken here a week ago Wednesday. I love to see the farming going on around here! It only happens a couple days a year. The corn crop was great this year due to our wet spring/summer. Soybeans did OK but not as well as the corn due to hot/dry conditions in July & August. We usually have about half corn and half beans, rotating crops each year. Corn is tough on the soil so we only do it every other year! Didn't know you were going to get farming lesson from a stamping blog did you?


We now have hot wire fence around this field and 8 head of cattle wandering around in there. This is right in front of the house. We can also see traffic going down the road for the first time in months. And we'll be able to see the deer hunters who are attempting to shoot from the road. I wish I were joking but I'm not. It's a real problem we have here. We have a great stand of trees through the middle of our property that is the perfect home for deer! We do have the number handy for the Game Warden!

OK, on to stamping! Time to share club samples from October-which seems like forever ago! Below is a swap card I received that I thought was really cute. I don't like to copy cards exactly, and I didn't have the same paper so I changed it up.


The swap card is by Cherri Gustafson. She used the Frosty Day DSP paper. My version is below using the Holiday Treasures dotted paper. Base color is Baha Breeze. Other colors are Ruby Red, Chocolate Chip & Old Olive. Mr. Twigster is stamped in Basic Brown and colored with Blender pens. We used 2-way glue to add Dazzling Diamonds glitter. The Curly Label Punch Bundle was also used. We stamped the Merry Christmas stamp in Ruby Red and punched it out. We stamped again in Baha Breeze and cut out the Merry Christmas. We attached it to the Ruby Red one with Dimensionals.


Next is a sample using the Top Note die. Again I received inspiration from a swap received. This one was created by Kathy Morgan and her version is below. The DSP she used is also from the Holiday Treasures pack. She used Always Artichoke for her base, Riding Hood Red behind her Top Note, wide Old Olive grosgrain ribbon, and a felt flower with Rhinestone brad.

I stayed within the same paper pack, but varied the colors a little. I used an Old Olive card base. I used a piece of DSP under the top note and a narrow Chocolate Chip grosgrain ribbon. I used a Baha snowflake from the Little Felt Flurries set in the Holiday Mini Catalog.

The possibilities are really endless with a pack of DSP! Each piece is double sided, and the colors all coordinate!
One more change to mention-I have a new job! I'm finishing up this next week at the local State Farm office and will be starting the following week at the Edward Jones office. I will only be working 3 days a week but it will be challenging work as it's a very busy office! I've done that type of work before so I'm excited to be getting back in that field. I intend to use my days off to get my house caught up (cleaned, organized..) and to do some more stamping! Most days now it's really hard to find time!!

If you haven't signed up for my newsletter (on the left in the sidebar), please do! I'm sending out a newsletter at least monthly with all news SU! You won't want to miss it as it may contain specials you can only get through me! Also, don't forget to tell your family and friends what you want for Christmas this year! They can contact me directly to order goodies for you, or they can order online.

Thanks all for stopping by!
10/21/2008

Stamp A Stack

Here are the samples from the Christmas Card Stamp a Stack last week. It was a fun evening and one that we will definitely repeat! probably sometime after the first of the year. I hate to think that it's already time to be thinking about the Holidays-YIKES! Hopefully these cards gave the ladies who came a jump start! They all left with 4 copies of each of these!!

First, was this one using the classic Lovely as a Tree set-a set I don't use often enough!!

To start, I cut a reverse template with the Coluzzle. We used that to sponge Mellow Moss ink through onto the Very Vanilla CS. Then we stamped the background trees with Mellow Moss-leaving the template in place-stamping them off once first to give a very light image. Next we stamped the tree and Merry Christmas with Always Artichoke Craft ink and heat embossed with Iridescent Ice Embossing Powder. Corners are ticket corner punched. Very Vanilla with the trees is layered on Mellow Moss, and then on the card base of Always Artichoke. Very pretty! This is one color combination of MANY that would work with this layout!

Next was this one using the Big Shot Snowflake die. I still have confetti on my floor from punching these out! Quick and easy card though!


Card base is Real Red, strip near bottom is Basic Gray. We stamped 2 snowflakes from the Snow Swirled set, the middle size on in White Craft ink, the small one in Real Red ink. The snowflake is cut from the Shimmery White cardstock. We put a red Rhinestone brad through the center and attached with dimensionals to the card front. The striped grosgrain ribbon is tied around the entire front of the card. It is difficult to see, but the bottom front edge of the card is punched with the scallop punch. The Merry Christmas was stamped in White Craft ink near the stop of the Gray strip.

The last card was cased from the catalog, page 40, using the Big on Christmas set. I did one without an image on the card base but it seemed plain, so I then added the Snowflake wheel in Riding Hood Red. We colored the 'let it SNOW' image using a blender pen and classic inks (Bashful Blue, Basic Gray, Only Orange, Riding Hood Red & Glorious Green). We then applied 2-way glue to the letters and added Dazzling Diamonds glitter for SPARKLE!! The Snow image was stamped on Whisper White, layered onto Bashful Blue an applied over the Bashful Blue Patterns DSP with dimensionals. Vintage Brads were added using the Mat Pack (or Tool Kit) for placement, and Riding Hood Red ribbon tied around.

Thanks for stopping by! I still hope to get on a more regular posting schedule but have been in a bit of a funk lately. Hopefully I'm about ready to snap out of it and get busy again! I still have several recent creations to share so I hope to be back soon!

10/15/2008

Recent workshop samples

WHEW!!! It's been a rough couple weeks! Seems like I go from one stamping project to the next, with no time in between. I give up predicting my schedule too. I thought last week would be less busy, but it wasn't! Tomorrow night is my last scheduled event though for quite a while so that should make life a little less crazy! We shall see!

Here are a couple samples from my workshop last weekend. My apologies in advance if these pictures are not the best. I may not have had the scanner set correctly. I will replace them with new scans as soon as I have time!


First is this card using the Snow Swirled set from the Idea Book & Catalog. Colors are Mellow Moss, Always Artichoke. White layer is Shimmery White. Ribbon is Artichoke. For the snowflakes, I stamped the largest in Mellow Moss, the next I stamped with Artichoke but stamped off once, and the little ones are in Artichoke. Scallop punch the edge, tie ribbon around, layer together, & add greeting. Quick and Easy!!


This one was a little more involved, but not terribly difficult. Base layer is More Mustard. Stamp the leaf image with More Mustard randomly around the right edge, top & bottom. Layer on a piece of leaf print paper from the Autumn Vine DSP. Stamp the tree in Chocolate Chip on Whisper White. Add leaves using More Mustard, Really Rust & Sage Shadow. Stamp the verse on a smaller piece of Whisper White. Sponge all white edges with More Mustard Ink. Tie gold cording around tree image & layer tree onto Chocolate Chip. Layer saying onto Really Rust and add a gold brad one each side. layer all together.

I hope to be back with more soon! I have samples from another workshop that are temporarily missing but I hope to find! I have Club samples from last week. And a Stamp-A-Stack tomorrow night with Christmas cards! Fun Fun Fun!!!

10/05/2008

World Card Making Day

What a fun day! THANK YOU to everyone who came!!! I think this may become an annual event! I had 4 card stations set up, door prizes, goodies to eat and more! What a great day stamping and sharing among all!

Here is the first card I made. I found the inspiration on SCS, but don't remember who the creator was (if it was you LMK and I'll give you credit!).

The card base is Chocolate Chip. Background layer is Pink Pirouette. On that layer we stamped the Tres Chic background stamp with Pink Pirouette classic ink. We used the Scallop Border punch for the bottom edge, then punched small holes with the 1/16 hole punch (or paper piercer). The white layer is the rose print from the Bella Rose DSP set. We stamped the For You image from the Say it with Scallops set in Chocolate Chip on Whisper White and punched it out with the Scallop Square punch. Layered the square on with dimensionals, tied Pink Pirouette ribbon around the top and layered all together!

The next card I created two versions of. I was inspired by my trip last weekend to the Nebraska Mini Convention where we used this set and the star punches to create several projects.

The color combination is the same on both cards, I just changed the layout a little and put the ribbon a different direction. Card base is Pacific Point. Background is Whisper White stamped with stars in Pacific Point, Baha Breeze & Ruby Red. I used the new large oval punch to stamp through the Whisper White and stamp the 'way to go' in Pacific Point on Pacific Point. To punch the stars, punch the small one first, then the large one. Layer together as desired!


On this one I left the stars whole and just added the smaller ones over. The edges of the Whisper White are sponged on both versions.


The 3rd card was this one using the With Gratitude set in Fall colors. The card base is Old Olive. Background layer is Confetti Cream cardstock. I first stamped the With Gratitude stamp as near the bottom as possible in Old Olive. Next I did random flowers around the edge in More Mustard, Close to Cocoa & Old Olive. The center image was stamped in Close to Cocoa. We then added More Mustard & Old Olive with a blender pen. All the colors blend together for a very pretty leaf! The leaf is layered on Close to Cocoa and a Kraft Taffeta ribbon was tied around. Gotta have that ribbon!!

The last card we did, was the swap card I did HERE using the Upsy Daisy set. Everyone loved it! I did it because my regular ladies have all commented on it. It was also a quick and easy one for everyone!


Hope you had a great Card Making Day! I'm off to do a workshop this afternoon but should be back this week to share more! Last week was a long week getting ready for yesterday (but it was worth it!!). This week should be a little more quiet so I can share some of the things I've promised but haven't made it back with yet!

10/01/2008

Birthday Celebration!


Wow, aren't we full of all kinds of news today!! Stampin' Up! is celebrating their 20th birthday all year, but the actual date was during October, so we're having a Birthday Sale! Click the flyer above to see the details. With a $20 merchandise purchase, you can choose from several Birthday sets at 20% off! Cool!! Contact me if you need more information!!

Decor Elements!!


For a limited time only, SU! is offering the Spooky Spider Decor element for halloween. Click the spider above to see the size options and prices! He looks like fun and he's not all that spooky!


And, as of today there are MORE Decor Elements available! Click the photo above to view them! These are a fun, non permanent way to dress up your home!! Contact me to order or with questions!

Holiday Mini!!

Starts today!! If you haven't gotten one in the mail, click the cover above to view!! It's loaded with goodies!!

Remember too, that you can now ORDER ONLINE!!! Just click over to my demo site here and choose the SHOP NOW button on the top right!

9/30/2008

Bella Rose Envelope Card

Here is the 2nd sample from club last week. Last month I used the Top Note Big Shot die with the ladies, this time we used the Scallop Envelope die. I will post the last project using that tomorrow! I try not to use too many different things at one time so we did two projects with this die!


For this one, we started with Kiwi Kiss Textured Cardstock for our base. We stamped randomly one of the flowers from the Sweet Serendipity set on the base. Next we layered on a piece of DSP from the Bella Rose set after scallop punching the bottom edge and adding a flower brad from the Filigree set. Next, we put together the envelope cut from a different piece of the Bella paper. The double sided prints really give it a neat look! After assembling the envelope, we tied a piece of White Taffeta ribbon around and adhered to the card front. Lastly we inserted a card stamped with a verse from the Sweet Serendipity set. I choose a friendship one, as you can see below.


Wasn't sure going through the creation process for this one, but love the end result! The Bella paper is awesome!!! Stay tuned-Holiday Mini coming tomorrow morning, and the Envelope box tomorrow night! Don't forget World Card Making day this Saturday! If you can't make it to an event, make some time to stamp!!

Thanks all for stopping by!

World Card Making Day


is this coming Saturday (October 4), did you know that?? Click the picture above for more information from Stampin' Up! and for details on the special! Of course SU! would have a special for a day like that!! Between October 4 & 11, you can order the Simply Sent Card Elements and Simply Sent Card Kits for 20% off! See page 176 & 177 in the Idea Book & Catalog.


I'm having an Open House Saturday from 10 am to 2 pm. If you're anywhere near Crete, NE and would like more details please contact me! I'm planning to have a least 3 card making stations (maybe 4) a product display, door prizes, goodies to eat and more!! It will be a fun time-hope to see you there!! Please RSVP if you think you might make it by!

9/29/2008

Christmas Swap & Club Card!

This card got double duty last week! I created it for a Christmas themed swap early in the week, then decided my club ladies would like it too!

Fairly quick and easy! Background color is Bravo Burgundy. I cut my cardstock in half the long way and folded, so the card folds up to open. I scallop edge punched that layer as well as the background Very Vanilla layer. I stamped the holly leaves randomly on the background vanilla and tied a Burgundy grosgrain ribbon around. The top layer is embossed, but tough to see on the scan. I stamped the tree with Bravo Burgundy Craft ink, then added Iridescent Ice EP and heated. It's a very nice, subtle effect. The verse is from the set Heard from the Heart. Quick, but very pretty!

I spent the weekend stamping at the Nebraska Mini Convention (thanks Kevin & Susan), so I should have some other samples to share soon! I will not share all, but a couple of my favorites! I have 2 more club projects from last week to share too, but many other things on my to do list! First is dinner so we can head to parent-teacher conferences soon! Thanks for stopping by!

9/21/2008

Faux Metal Technique

Here is a sample I made for my Week 2 Bootcamp stamping challenge-try a new technique. Sadly it was the only stamping I got done this week! Especially since I have a swap due soon and I haven't even started, and club this week! YIKES! Hopefully this task will get the creativity flowing again!


OK, here's what I did. I started by embossing the background and main tree image (from the Christmas Classics set). I stamped them with Encore Gold ink, then poured Iridescent Ice embossing powder over and heated. Very pretty!

Then, for the Faux Metal, I took a piece of Brushed Gold cardstock. Just a piece big enough for your stamped image with extra room for you to hold on. The image I chose is from the Cute & Curly set that coordinates with the Curly Label Punch. Take your versamark pad and smush it onto the cardstock, covering enough space for your stamped image. Cover with Gold Embossing Powder. Heat. Cool just a few seconds and repeat. Now that it's been heated twice, prepare for the 3rd time. Get your stamp close by and put just a bit of versamark on it. Repeat the Embossing powder one more time, and while hot press your image into the embossing powder. When cool, punch the image with the punch and apply to your card! Great Technique!!

9/15/2008

Workshop Samples

I did a workshop here last week and wanted to keep it fairly simple as I expected new stampers. First we did this card using the Flight of the Butterfly set.

First we stamped the Polka Dot background stamp on Whisper White with Bashful Blue. Then we did the butterfly in 2 steps: First, ink up the background and stamp off once. This gives us a lighter shade of blue. Then, stamp the dots full strength. You have the choice of "winging" it with the dots, or using the stamp-a-ma-jig to line them up. Add the "trail" of words and your ready to layer it all together! Add the Bashful Blue striped grosgrain around the background layer and you have a quick and easy card!


This one I did to show them another color option and a couple "step-ups". We added glitter to the dots on the butterfly with a 2-way glue pen. A very messy pen-sorry ladies! I also added a brad in the lower corner. Otherwise same card, quick and easy, but a completely different feel!


Lastly, of course I had to use Upsy Daisy! For this one, we stamped the flowers on the background in More Mustard on More Mustard by moving the flower stamp around and stamping some off. To color the flowers we used the marker, in More Mustard first, then stems in Old Olive. Make sure you "Huff" on it before stamping to refresh the ink! Stamp the verse at the top, sponge the edges with some More Mustard, and add a ribbon at the top. I really like this reversible ribbon!

9/14/2008

More Upsy Daisy!

I know, I need to get out a different set! I will this week, have to work on club cards for next week, and a Christmas themed swap. But, here are two I did this week-and actually mailed!!! What a concept!

The first was for a friend's birthday. She just happened to mention it, so I just happened to send her a card!

For this one, I did a water spritzing technique. I'm sure it has a name, but at the moment I don't know that what is! I colored the image with our markers, blending light to dark on each flower. So, I first colored the flower solid with Pretty In Pink, went over the lower 2/3 with Pixie Pink, then the bottom with Pink Passion. Stems are Old Olive (I believe). Before stamping the image I spritzed it with water. Click the image to enlarge and you'll see the effect of the water. The background is the Polka Dot background stamped in Pink Passion on Pink Passion. I stamped the Birthday Celebrations in Pink Passion on Whisper White and punched with the Key tag punch. I added some Light Pink Gingham ribbon & Silver cord behind. Lastly I added one of our new Filigree brads in the upper corner and attached with a Pink Rhinestone brad.


This one was a sympathy card for a stamping friend lost her father-in-law this week. I wanted her to know I was thinking of her and the family. I used the same technique here, just earthy colors. Flowers were So Saffron, Summer Sun & More Mustard. Background is the Sanded stamp in More Mustard on More Mustard. The saying is from Close as a Memory stamped in Mustard. For this one I tied a simple gold cord around the bottom of the flower layer.

I have workshop samples from last week that I will be back tomorrow to share. I have been busy organizing and cleaning-all part of my Business Boot Camp class. I still need a few hostesses-if you're interested please let me know ASAP!!! Thanks all for stopping by.

9/13/2008

Catalog CASE!

This card was an assignment from the Business Building Boot Camp that I'm doing over the next few weeks. We were assigned to copy a card from the current catalog to show that it's possible to create by taking an existing idea and tweaking it!

I chose the card on page 140 with the chipboard snowflake. I made a scallop flower by punching a Pink Passion scallop circle, and cutting in towards the center with my Paper Snips. Using the Sweet Serendipity set, I stamped the little flower randomly over the background in Basic Gray on Basic Gray. I also stamped this little flower in Pink Passion on Whisper White and punched it out with the 3/4" circle punch. I also punched a 1" circle . I added the 1" to the center of the scallop with just Snail Adhesive, then used a Dimensional for the 3/4" circle. The words were stamped in Pink passion on Whisper White that I used my tool kit piercing tool & guide to pierce along the top. A Basic Gray Taffeta ribbon is the final accent!

9/09/2008

Online Ordering NOW LIVE!!!

Stampin' Up! has been working very hard!!! Today they released the Online Ordering feature through demonstrator websites. Click here to go to my site, then click the Shop Now button at the top. I obviously can't test it out all the way through, but it looks pretty cool!!! I added a link in the sidebar too with the 24/7 Ordering icon. I'm excited-It just keeps getting better to be a Stampin' Up! demo!!!

Off here, and back to work! I NEED to do some stamping this evening!

9/05/2008

Still Here!!

Thought I would check in with a quick note. Nothing stamped to share, and I should be cleaning house, but where am I???

First, if you are intersted in attending a Stampin' Up! workshop and you are any where near Crete, NE I'm doing one next week (Thursday, 9/11, 7 pm) and you're invited! I'm doing an online business building class and need to do MORE workshops! I've never really started anything in my new hometown (I've only been here 4+ years) and I decided NOW is the time. Contact me if you'd like more info!

Second, if you're interested in hosting your own SU! workshop, contact me! I will travel or we can put together a catalog party!

Next, an update on all things Stampin' Up!

1- The Never Before Seen Stamps, Never Before Seen Savings promo is still going through September. These are great new (DIE CUT) stamps at 15% off! Contact me today to order yours! Or, better yet, book a workshop and earn them FREE!!!

2- If you don't have the new catalog yet, contact me. It's fabulous!!! We'll make arrangements- I send them free to customers who order regularly from me!

3-The Sizzix Big Shot is now available from Stampin' Up! I gotta say, I LOVE IT!!! It's the most exciting thing SU! has done in a very long time! They are always giving us great stuff, but this is over the top!!! I hope to have more samples to share soon!!

Well, I had better go clean something!!! Take care all!

8/26/2008

Another Upsy Daisy!

One of my new favorite sets! And yes, it looks alot like the other card I did, but different technique, colors, and ribbon!

Color is the new In Color-Riding Hood Red. Love it! especially the new Taffeta ribbon. I stamped the card base with the "grass" image from Inspired by Nature, stamping off once first. I then stamped over it twice at the bottom with the daisies. I cut the Top Note from Naturals White cardstock-the Whisper White just seemed too bright for this set! I stamped the flower image full strength, then again just down and over to give it the shadow impression! Cool! and very easy! I added the 'Thank You' at the top, with Vintage Brads below. Lastly I tied the ribbon around the Top Note in a knot and put the layers together.

That's it for tonight. I'm already up way late and have a couple important things I must do before calling it a day! Thanks for stopping by!

8/24/2008

Club Cards

Well, once again, I don't know where the time goes!!! We really don't have that many activities on the calendar, but I think between working & keeping up around here, time just gets away. I'm hoping for a quiet week this week so maybe I can get some stamping done!! But I'm not betting on it!

We had club last Thursday-it was good to see all the ladies!!. I always appreciate having a reason to stamp-it's much easier to make it a priority!!

Here is the first card using the new Upsy Daisy set. Remember it's one of the ones on the 15% off NEW SETS special!! This is a GREAT set with LOTS of possibility!!


I used my Big Shot to cut the Top Note out of Confetti Cream Cardstock. We them stamped the flower image in Versamark and applied Old Olive & Summer Sun Pastels using sponge daubers. We added the verse at the top of the Note and applied Old Olive Pastel. The ribbon is the new Kiwi Kiss/Very Vanilla Satin. Yep-reversible-HOW COOL!!! This is just a knotted ribbon. Start your knot slowly with the Vanilla side out. As you start to tighten the knot, turn the tabs to Kiwi!!

Next was this card using the Inspired by Nature set. Card base and background layer is Riding Hood Red, Neutral is Naturals Ivory. We applied ink to the stamp with sponge daubers. Start with Kiwi Kiss for the stem, Riding Hood Red for the flowers, Chocolate Chip for the flower center. Huff & stamp! With a bod image stamp like this one, you may want to ink once or twice and stamp on scratch paper. It sometimes takes several inkings to get the best look! But the result on this card is very soft and pretty! Another set with LOTS of possibilities!!


Lastly, we did this card using the Say it With Scallops set that UPS was SOOO kind to give all us demos who attended convention!! It is the current Ronald McDonald House Charities set. For each set purchased-$2 goes to the Charity! As of catalog date, SU! had contributed almost $700,000!

On the card, we stamped the 'hi" image in Tangerine Tango on Whisper White and punched it with the new Square Scallop punch. You have to have the punch with this set!! Card base layer is So Saffron, followed by a Tangerine Tango layer. Background paper in coordinating colors is from the Haiku DSP. We tied the new In Color ribbon-5/8" striped grosgrain-in Tangerine Tango around the DSP layer, and added the layered squares with dimensionsals. Quick and Easy!!

8/12/2008

New Catalog-More Info

Hey all, I just wanted to share that I was able to download the catty in less than 3 minutes! Yes, I have a fairly fast connection (wireless) but I was very impressed by that! It tells me the traffic is slowed! I also did the right click and saved it to my desktop. Now I can look at it anywhere, anytime I have my computer!

Also, this pdf format for the catty is a temporary solution while they work on bringing online ordering to our Demonstrator Business Websites-YEAH!!! How cool will it be for you all to click my demo site anywhere, anytime and place an order!!! Coming sometime this fall!!

New Catalog!!

Sorry for the late post, but there's always so much frenzy with the start of a catalog, I figured I'd wait just a bit to try posting links-so maybe they'll actually work! Maybe!

Apparently SU! has posted the catalog in a pdf format this time, instead of the live link like before. Therefore it takes VERY long to download. So, if you have a paper copy-stick with that! If not, try this link CATALOG HERE, but be prepared to wait! HINT: Right-click the link to save it to your computer to view anytime. It is a large file!! My suggestion-Call your favorite demonstrator and get the actual copy in your hands!!!!

OK, in addition to the new catalog, like it could really get better??? Well, it does. We have several of the NEW sets on Special-15% off!! Click HERE to see Never-Before-Seen Sets at Never-Before-Seen Savings!!! There is a flyer on the right side if you'd like to click that for easy printing.

And, if you've ever considered becoming a demonstrator, we have several kits for you to choose from now!

The basic starter kit is priced at $199 (valued at over $350 in business & stamping supplies), and if your purchase NOW you get to choose ANY set FREE from the new catalog, in addition to the products in the kit!! Click here to view more information about the standard kit. You can sign up through my demo site in a matter of minutes!! Contact me for the password first, then click JOIN NOW and follow the steps!!

Also, SU! has added THREE $99 Starter Kit options. Yes I said Three options for $99! These include the same business supplies as the standard kit, but different product options. One is Stamp focused, one Scrapbook focused, and the other Home Decor focused. Click HERE for more info!

Contact me if you need more information on any of this! or if you NEED that new catalog!

Thanks for stopping by!

8/10/2008

Last Chance!!

To order from the Spring-Summer Collection 2008. I realize I probably should have posted this a day or two ago-OOPS!! Contact me TODAY if you are in NEED of a set or accessory that is retiring. The catalog is linked above and I'll link you below to the

Retiring Stamps by page Number

and

Retiring Accessories

Let me know if you have any questions!! I'm planning to take the boys school shopping this afternoon, but I'll be home this evening if you need to reach me. I'm usually on the computer til around 10 pm central, so try to reach me before that!!!

The NEW catalog goes live at NOON Mountain time tomorrow (Monday)! I'll be back after work tomorrow to post a link to it, and the sale flyer. Several of the new, incoming sets are discounted through September!! And, have I mentioned that ALL the NEW sets in the catalog are DIE CUT!! And, next catalog (January) ALL the sets will be die cut! SU! just keeps making things better and better!!

8/09/2008

Last swap

Here's the last swap card I did. It's basically the same as the previous Peony Card I did, but that one used Pomegranate ink & paper and that was no longer current. So, I switched to the new Pink Pirouette with Pretty in Pink. The result was very soft and pretty!!!

Card base is Pretty in Pink, stamped in Pretty in Pink with the Tres Chic background. Green layer is Certainly Celery, as are the leaves. I used Whisper White to stamp the flower first layer in Pink Pirouette and second layer in Pretty in Pink. Leaves are Celery, stamping the first layer off once and second layer full strength. I did use the Stamp-a-ma-jig also to line everything up. A little more work-but worth it!! I sponged the edge of the white layer around the top in Pretty in Pink, & bottom in Certainly celery. The ribbon on this one is Pretty in Pink grosgrain, but I did some with White Taffeta and it worked quite well also. The Half-Pearl is from the Pretties Kit.

Thanks for stopping by! We're off to a county fair figure 8 race this evening. Great family fun! It will be our 3rd this week-guess we really like them! It's a nice cool day out too!

I hope to be back tomorrow with make-n-takes from convention, or something new! But I've got to take the boys school shopping as they start Thursday! I'll be back soon though!!

8/07/2008

3rd Swap

Here is the 3rd card that I came up with to swap at convention. I had just gotten this word set, All Holidays. My primary interest in the set was this saying!!

Card base is Elegant Eggplant, with a Very Vanilla layer, than a Floral background image stamped in Elegant Eggplant on Very Vanilla. The saying is also stamped in Eggplant on Vanilla, with an Eggplant layer behind. I rounded two of the corners for the unique shape. Two medium half-pearls were added with mini glue dots and Vanilla grosgrain ribbon was tied around and layered under the saying.

I actually had another version of this, not sure if I still have one or the scan. But I had some of the Eggplant grosgrain and White half pearls. So, I used the Shimmery White CS instead of the Vanilla, and replaced the Vanilla ribbon with Eggplant, and the Vanilla pearls with White. It was very pretty!!

I didn't make a ton of any of these cards-I was working with limited supplies on all. That's what happens when you don't plan ahead! It worked out OK though, I didn't get bored with any of them! I had some where around 115 cards in all and that was plenty to carry and trade. I have one more to show you, either later today or tomorrow. I have taken the last few days off from anything stamping related, but need now to get back on track! My Bigshot should be arriving today, and hopefully catalogs too! That should motivate me to head upstairs this evening and WORK!!!

8/03/2008

Heading Home

Convention has been a blast! I'm very inspired to kick this business up a notch!! I hope to make more time for stamping, and get more classes and workshops on the agenda! If you're interested, contact me-the catalog is AWESOME!!! I really haven't taken time to study all the sets yet, but I love it as a whole! We even have some specials upcoming-I'll post those later this week. Just a quick note now as I have a little time to kill before heading to the airport. It will be a long travel day but worth it to be home this evening!!!

The biggest news from convention is that SU! has partnered with Sizzix and we will be carrying the Big Shot machine along with some Sizzix dies and some exclusive SU! dies!!! Mine is ordered and I can't wait to give it a try!!! I will post when it will be available for YOU to order!!

The most fun at convention was yesterday at the end of General (closing) session. UPS delivered a stamp set to each of us!! The UPS truck (the one with flames!!) was on screen, and and UPS man came on the stage to say he had a delivery for each of us!! We received the new Ronald McDonald set-a very cute set that coordinates with the new Scallop Square punch. FUN!!! I will make something with it as soon as I can!!

Here is my second swap card, also using the Level 3 Hostess set, Happiness Always.

This one has a Chocolate Chip base, with Pirouette Pink & Baja Breeze layers and Shimmery White. Love these colors together!!! I added a half pearl to the button, which is also in the new button set.

Thanks to all of you who have stopped by in the last few days, the counter has jumped!! I hope you'll come back! I will be back to share soon from HOME!!!

7/29/2008

From Salt Lake City

I made it!!! and I got more sleep last night than most of the other demos I've talked to!! I didn't have a super early flight though, so that helped. Today was just a travel day, but tomorrow we get to pick up our bags that will contain the NEW CATALOG!!! Not sure how much I'll be able to share, or have time to, but I will try to check in again.

Here is the first swap card I came up with using the new (Level 3) hostess Set, Happiness Always. I really like this set!! It also features new colors, and a new button!

The stamp set is a two-step. The first step is a solid image, but kind of sketchy. Hard to describe. The second image is made up of letters. They combine for a great look-just make sure to stamp the first image off once, or use coordinating colors (lighter first, then darker). Hopefully if you click the image you can get a larger view!

The new colors featured are Riding Hood Red (Card base, red images & button), Pacific Point (2nd layer & blue images), and Kiwi Kiss (stems). The saying is stamped on Whisper White and punched with the Key Tag punch. Corners were rounded, and the whole white layer was sponged, with Pacific Point around the top, and Kiwi Kiss on the bottom. Riding Hood Red was sponged on the punch out. I threaded Lined thread through the button, then sponged on some Pacific Point ink.

That's it for now! Thanks for stopping by!

7/24/2008

Embellished Bag

This is what I did last night, when I should have been making more swap cards! This is part of the process of getting my ducks all in a row though! Lots of little things have to be done. I spent about an hour tonight on the computer getting my plain reservation, hotel info, Convention schedule, etc together. Slowly, I'm getting there!

OK, to the point of the post! This bag is from Daily Window and is their Eight Days a Week bag.


It's really not anything terribly fancy, but I'll be using it as a purse and carrying it through 3 airports, in & out of shuttles or taxis, to the hotel, and to the convention center. I'm not a fancy bag person anyway! It's a little bigger than what I usually use, but I'm hoping to fit most of my swaps in too. So, far, so good! It's the perfect width for cards!! Below is a close-up of the stamped part.
I found a stamp from a previous convention that says "Happiness is Stampin' Up!". It has fun little flowers on it that are similar to the preview set we demos got to order, Wow Flowers. So, I grabbed some colors and got stampin'! Featuring the NEW In-Colors Kiwi Kiss, Tangerine Tango & Pacific Point with Pink Passion. The liner in the bag is pretty close to the Kiwi color & my cell phone & business card holder are bright pink. Color coordination-who doesn't love that?? We also have some Rhinestone Brads that coordinate with the Kiwi, so I added some to the image, and also to the bag. See above the buckle on the handle? Green on top, then clear. And one green one also beside the horizontal buckle.

I added a link to my side bar for Daily Window-so come back anytime to check out their site!

Dry Embossing Samples

By request, we did some Dry Embossing cards at club. I hadn't done it for quite a while, but here's what I came up with.

The color on this is off, but I went ahead with it because you can (sort of) see the dry embossing.


The petals from Pick a Petal are So Saffron, the center Brocade Blue on Very Vanilla. Base Layer on card is Brocade, with a Saffron layer next to the Vanilla.


I started by stamping the solid image (the larger one with the circles within) in the center of the card to serve as the center of the flower. I stamped the ink off once before stamping on the cardstock. I then did the petals, doing a + with four, then an x with the other 4. Hope that makes sense. It helped me to space them.. I also inset the + 4 a little more than the x 4. Clear as mud??


After the petals were done, I came back with the outline circle in the Center with full strength Brocade Blue and the 'wonderful' from Warm Words.


Next is the dry embossing. The order here: Put your Brass Template down on the light table, turn your stamped image upside down and line up the stamped petal inside the template petal. Using the larger end of your stylus, trace inside all the petals, then the circle in the center. Fill in with random dots above, below & beside the flower.


Using a glue dot, add a button in the center that has been tied with coordinating embroidery thread and you're done!


And then, for another look, we did this card. The lighting again isn't the greatest, but you can see the dry embossing. All of our templates have the holes for paper piercing as well as embossing, so we did both on this one using the Priceless set and template.

We first dry embossed the flourish in opposite corners angled to the center. This is a fine line template so you'll need to use the small end of the stylus! Once that is done, you can stamp the butterflies and the Priceless in the corner. The card base is Basic Gray, with a Pixie Pink layer and Whisper White. The butterflies are in Pixie Pink, the Priceless in Basic Gray. We then dry embossed around the butterflies with the template (again, template down & turn image upside down to line up). Using the template again, we picked up a needle from the Crafters Tool Kit and pierced the swirl coordinating with the dry embossed flourish. Line up your flourish before piercing! Lastly we added a dark silver brad from the Vintage brads set.

Enjoy! Back later with the bag I did last night!

7/23/2008

Taking a Break!

from creating. I have a whopping 36 cards made to trade, but I also decorated a bag to carry. I'll share that tomorrow. For now, I thought I'd share a few pictures I've taken recently, non stamping. I got a new camera, in part to take to convention, so I had to try it out!!

Here's the view down my driveway from the front porch.


For you who aren't country residents, that is corn on the sides. It's between 7 & 8 feet tall. It has tasseled & is currently setting ears. That's where the $$$ is so we're hoping for some more rain! Here's a closer view of the corn, from the corner of the front porch looking to the side. The front yard is edged with the field corn.

Next are a couple of flower shots-I'm very happy with how they came out! I love these roses-the color is so vibrant. Knock Out Shrub roses if anyone is interested!


And a pot of Petunias. I have several around. They are a little chewed up by grasshoppers and windblown, but all in all, they look pretty good!


Lastly, even the dog Shadow decided to cooperate and pose for me. The boys were no where to be found!


Thanks for stopping by! I'm calling it a night and I'll try the creativity again in the morning, or more likely, after work. I will try and post the other 2 Club card samples tomorrow sometime!

Retiring Accessories

SU! Released the list of retiring accessories on Monday and some have sold out already! I'm not going to post the list here, in part because I don't have time to keep it updated, but email me if you haven't seen it. I can post a link to some items that are on special here. These items are retiring, but have been discounted! LMK if you NEED any of them!!

I'm off to finish some swap cards, and see if I can up with a few more! Convention is next week!!! I'll have the new catalog Wednesday!! YIKES!!!

Crayon Resist

Sorry for the delay in posting the club samples from last week. The weekend was rather busy with stuff, and I've been trying to make some swap cards this week. Have a few done, but not anywhere near what I'd like.

This card uses Basic Black & Tempting Turquoise Cardstock for the background & base, and Glossy Cardstock for the top. We started with plain Glossy, and stamped with Black Stazon the open flower and butterfly images. HINT: Let the Cardstock sit for a bit after stamping the Stazon Images. Glossy takes a while to try, even for quick drying Stazon. Then, we took a crayon and colored a little inside the flower and butterfly. When we sponged ink over then, where the crayon is resists the ink. Yoyo Yellow was used over the butterfy and flower, and Tempting Turquoise in all the other areas. You end up with green in a few areas from combining the Turquoise & Yellow. Take a Kleenex or paper towel and rub over the crayoned images to remove extra ink. When dry, add the small black flowers filling in the extra spaces. Add ribbon, and oval greeting.

Stamping on glossy takes a little practice and a light touch! Give it a try!!